

Why Is My Malibu Touchscreen Delaminating? Here's What's Actually Happening Behind the Glass
If you've noticed a cloudy bubble forming on your Malibu Wakesetter touchscreen, you're not alone. Here's what's actually happening inside the display, why it tends to happen on Malibu boats (along with Mastercraft, Nautique, Tigé, Supra, Yamaha, and dozens of other brands), and the three ways to fix it without paying $3,000–6,500 at the dealer.

If you've spotted a cloudy bubble forming in the corner of your Wakesetter touchscreen, or your screen has gone dim, frozen, or unresponsive, you're not alone. Here is exactly what's happening inside the display, why it tends to happen on Malibu boats along with Mastercraft, Nautique, Tigé, Supra, Yamaha, and dozens of other brands, and what you can do about it.
In this guide
- The three layers inside your touchscreen, and the one that actually fails
- The 4 failures you may see: delamination, dim backlight, frozen touch, and ghost touch
- Why the bond tends to fail, and how delamination progresses over time
- Why the same issue affects so many boat brands, and your three repair options
What's Inside Your Touchscreen?
The three layers that make up your dash display
Your Malibu's touchscreen isn't a single piece of glass. It's a sandwich of three primary layers, plus a sealed housing around them. Once you understand the layers, the failure mode makes a lot more sense.
Cover glass
The outermost layer, the part your finger touches. Tempered for impact, coated to resist water spots and glare. Exposed to sun, salt spray, sunscreen, and the occasional flying ski rope.
Glass digitizer (the touch grid)
Bonded just below the cover glass. A grid of transparent conductive lines translates each finger contact into an X/Y coordinate your boat's computer can interpret. The digitizer is what actually senses touch.
Optical adhesive (the failure point)
This is the layer that matters most. Between the digitizer and the LCD, the factory applies a clear, optical-grade adhesive. Its job is twofold: hold the assembly together as one rigid piece, and eliminate the air gap between the touch layer and the display so what you see lines up perfectly with where you tap. When this adhesive starts to break down, every visible problem you see at the helm starts here.
LCD module
The image-producing layer underneath. Backlight, polarizers, liquid crystal cells, color filters. The LCD itself is usually still healthy when these displays come into our shop, it's the bond above it that's typically the issue.
The 4 Common Failures You May See
What goes wrong, and why
Delamination is almost always the first visible sign. Left unchecked, it tends to trigger a cascade of other failures: backlight degradation, frozen touch, ghost inputs, and LCD damage from moisture intrusion.

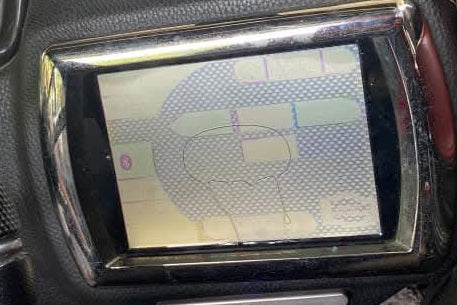
🌊 Delamination
A watery, cloud-like glue-separation forms behind the glass. The factory adhesive breaks down under heat and UV, starting at one corner and spreading across the panel over time.
🌓 Dim or Dark Backlight
The original LCD backlight loses output with age, making the screen hard to read in direct sun. Often happens in the same window as delamination because both are driven by years of heat and UV.
⏱ Frozen or Unresponsive Touch
Buttons stop registering, zones go dead, or taps land slightly off-target. As the adhesive separates, it pulls the digitizer out of alignment with the LCD, directly causing touch failure.

🔴 Ghost Touch & LCD Defects
Phantom presses, random color bars, vertical stripes, or backlight bleed. Moisture entering through the delaminated seal accelerates this damage once it starts.
🎦 Watch the Delamination Walkthrough
Here's a short walkthrough of a delaminated unit being opened up so you can see exactly how the layers separate, and what's left of the original adhesive bond after years on the water.
Why the Bond Tends to Fail
The real cause, not user error
The marine environment is unusually hostile to optically bonded displays. A touchscreen in your living room sees stable temperature, indirect light, no vibration, and no salt. The same touchscreen mounted on a boat sees the opposite of all of those things, often for ten or twelve hours a day during the season. Three forces in particular work against the original adhesive bond:
- Direct UV exposure, the helm catches sun for most of the day, season after season. The cover glass filters some UV but not all of it. Over time, the polymer chains in the adhesive begin to break down. The bond becomes less elastic, less tacky, and less able to maintain its grip.
- Heat cycling, a boat that bakes in 95°F sun all afternoon and gets stored in a cool slip overnight goes through dozens of large thermal cycles every season. Every material in the display sandwich expands and contracts at slightly different rates. Over enough cycles, small voids can form at the bond line. Once a void exists, moisture and air have a place to go.
- Hull vibration, boats vibrate. Hulls slap. Engines hum. Wakeboard towers shake. Persistent vibration accelerates the formation of micro-voids in adhesive that's already been weakened by heat and UV.
- Marine humidity, once a gap forms at the edge, moisture has a path inward. That can accelerate the delamination spread and start damaging the LCD backlight, the touch controller, and the connections to your boat's data network.
How Delamination Tends to Progress
What to expect if you're watching it happen on your own boat
If you've started noticing the early signs, here's roughly how it tends to unfold over time. Catching it in the early stage usually means a simpler, cheaper repair.
- 1Early stage: A small cloudy spot at one corner of the screen, often the lower corners first. Easy to miss unless you're looking for it. The screen still works normally. Touch is unaffected.
- 2Middle stage: The cloudy area has spread inward and become more pronounced. Text and icons under the affected zone may look slightly out of focus, almost like they are swimming. Touch response in that area may start to feel slightly off-target.
- 3Later stage: Delamination has reached the active touch area. Visible bubbling, peeling at the cover glass edge, possible moisture intrusion. Touch response in affected zones becomes inconsistent or non-functional.
- 4Late stage: Full delamination, backlight damage from moisture, frozen touch, or complete display failure. Still repairable, but the repair gets more involved once water has gotten past the seal.
Why This Affects So Many Boat Brands
Same OEM platforms, same physics, dozens of different cosmetics
One thing that often surprises owners is just how many different brands have this same underlying issue. It's not that one manufacturer designed a bad screen, the marine display industry consolidated around a small number of OEM suppliers, and those suppliers' platforms ended up in nearly every premium dash on the water. Three names cover most of what we work on:
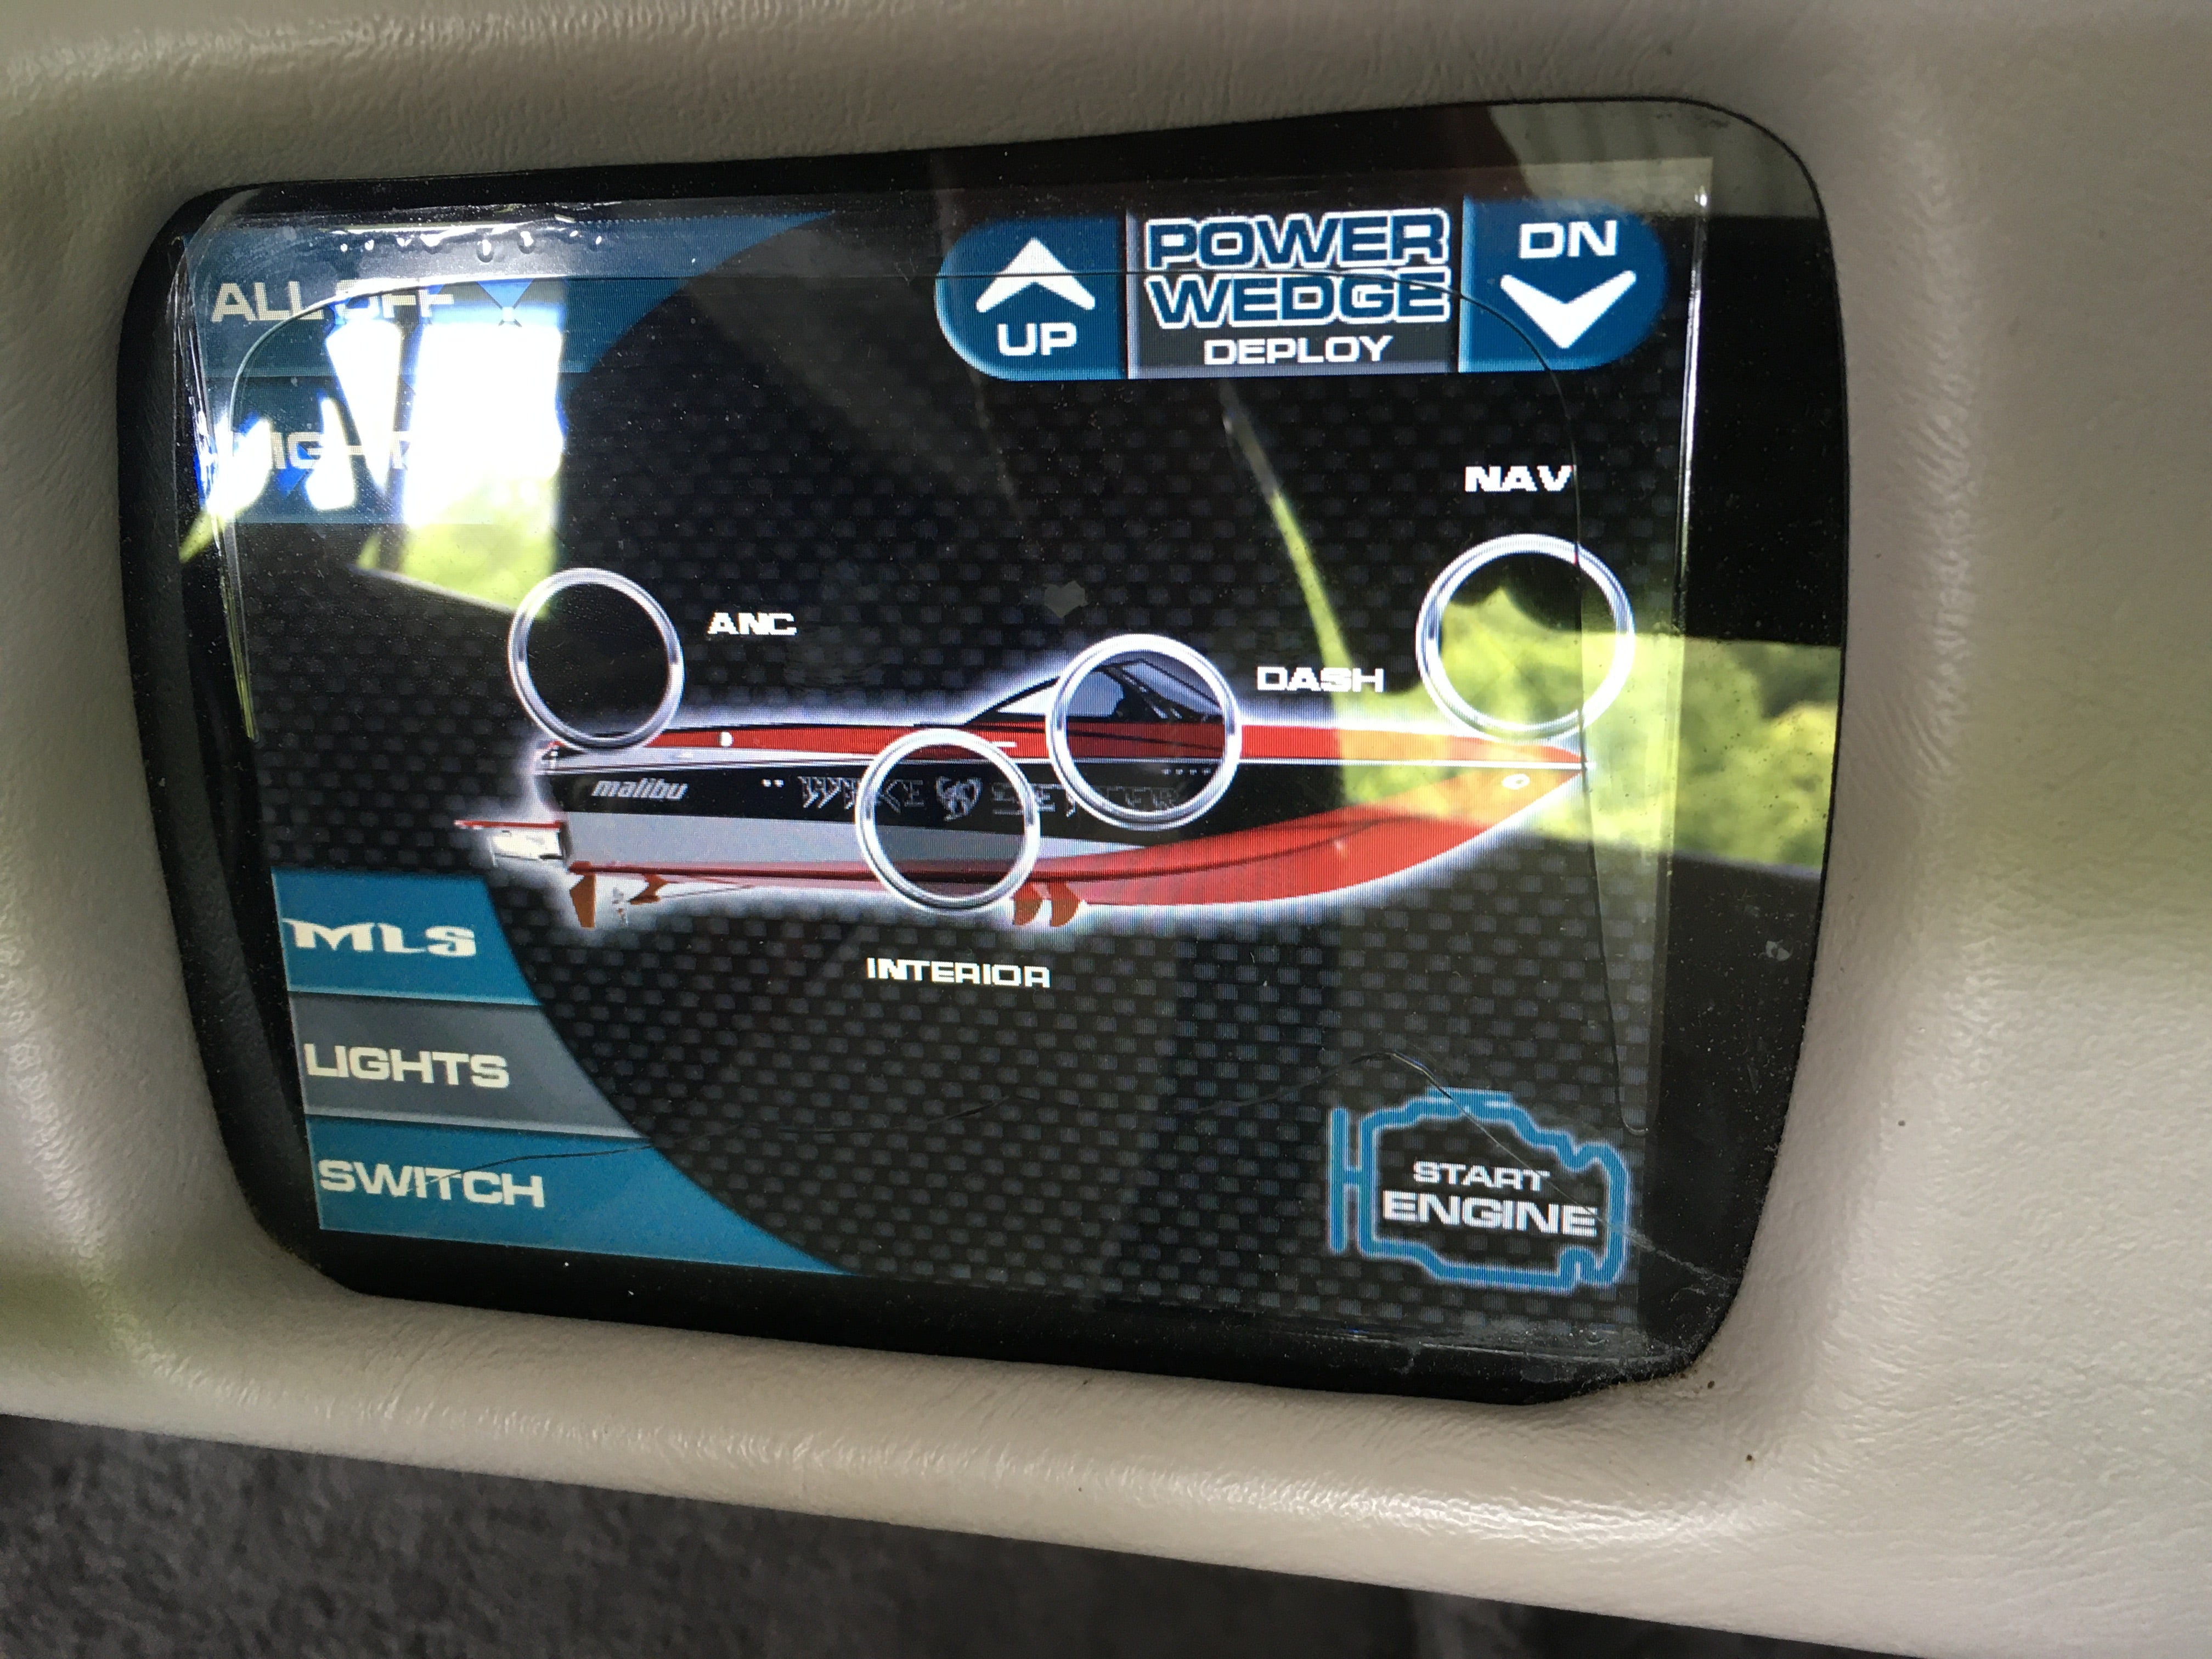
Medallion, the 6.5 inch Smart Touch (Malibu 2011 to 2015, Tigé), the 6.5 inch Viper 1 (Mastercraft, Chaparral, Sea-Doo), and the 7 inch and 12 inch Viper 2 family (Malibu Wakesetters, Chaparral, Scarab, Sea Ray, Monterey, Four Winns, and more) all come from the same supplier. Different sizes, different cosmetics, same bonding architecture.
Murphy / Enovation, the HV700 / HV700HB 7 inch platform appears in Mastercraft, Tigé, Centurion, Supra, Nautique, Regal, Premier, South Bay, Harris, Four Winns, Bayliner, and Sylvan boats from 2012 forward. The same supplier also makes the 12.3 inch Powerview / LINC Panoray on Nautique G-Series, larger pontoons, and select Mastercraft and Tigé models.
Actia, the 4.3 inch Yamaha Connext (also called Activision 430) lives in 2018 and newer Yamaha jet boats, Yamaha WaveRunners, and Godfrey pontoons including the Sanpan line.
Across all three suppliers, the underlying construction is similar: optically bonded layers in a sealed marine housing. The visible cosmetics on the front, the integrations with each brand's boat computer, and the model-specific part numbers all differ. But the failure modes, and the underlying physics, are largely the same.
What You Can Do About It
The expensive parts of your display are almost always still good
If your screen is showing the early signs, or has fully delaminated, the good news is that the expensive parts of your display are almost always still healthy. The motherboard, the housing, the wiring harness, and the connectors to your boat's data network: all reusable. What's failed is a small, specific assembly of layers at the front of the unit. That's the part we replace.
Across most of our products, we offer three repair paths so you can pick what fits your timeline, budget, and comfort with hands-on work:
Find Your Brand-Specific Repair Guide
Already know which display you have? Jump to the right deep-dive
This post covers the underlying mechanics that apply across the marine display industry. If you already know which screen your boat has, the guides below go deeper on each platform, specific part numbers, dealer pricing, and the repair path that tends to make sense for that model.
Ready to restore your helm?
Stop the Delamination. Fix It Right.
Mail-in repair turnaround is 3 business days or less. DIY kits and refurbished exchanges available on most models. All settings retained, no programming, no dealer visit.
Get a Free Diagnostic →